Table of Contents
- Introducing ASFS 2.0
- Setup
- ADFS as an IP-STS for an Organization
- Claims Engine
- ADFS in an Account Partner – Resource Partner Relationship
Introducing ADFS 2.0
In order to understand what ADFS is and what role it plays in your architectures, you have to understand a set of concepts, standards, and technologies. Claims-based architecture, WS-* standards, and Windows Identity Foundation (WIF) are all essential to the understanding of ADFS. Luckily, I have discussed all these in considerable detail in my latest article which you can read here. http://thedotnethub.blogspot.com/2012/12/understanding-windows-identity.html
If any of these topics is new to you or you need a refresher about, then please go ahead and read the above mentioned article before going on.
…So you read the article and your back! This means that you know that ADFS can play the role of an IP-STS and R-STS. This article discusses ADFS in the context of both roles.
Setup

I used makecert.exe to create CAs and self-signed certificates on each ADFS box. Each ADFS instance trusts the public key of the CA of the other ADFS.
ADFS as an IP-STS for an Organization
In this scenario, consider an organization – represented by the lab.local domain – which wants to outsource its authentication logic to an IP-STS played by ADFS 2.0. The client applications are equipped with WIF to handle WS-Federation protocol.
Start off by creating a VS 2012 web application, use the Identity and Access wizard to add the ADFS in lab.local as a trusted STS by locating the ADFS Federation Metadata:

What this has done is transforming the application to an RP; which you can see by checking the web.config file of the RP as well as the newly created FederationMetadata.xml file under FederationMetadata\2007-06.
One thing of notable importance is that the RP is now equipped with the WIF Http modules required to handle the WS-Federation plumbing. Once again, check my WIF article for full explanation about this. http://thedotnethub.blogspot.com/2012/12/understanding-windows-identity.html
At this moment however, the RP is not yet ready to outsource authentication to ADFS. We need to add the RP as a trusted relying party in the ADFS management console. To do so, right click Relying Party Trusts and select Add Relying Party Trust:

And that’s it! You have outsourced authentication from the RP to ADFS which will generate security tokens containing claims for your RP.
To see this in action, fire your browser and navigate to:
https://win2012.lab.local/TestADFS/
You will be redirected to ADFS to authenticate and will be prompted by the default windows authentication pop-up window (more about ADFS authentication later). Supply the domain username/password and you will authenticated by ADFS and redirected back to the RP with the configured claims (claims engine in ADFS will be discussed later).
What did actually happen behind the scenes? Well again – and for the last time I promise – check by WIF article for all details, however lets again use Fiddler to highlight some important information. Before doing so, use the following link to enable Fiddler to capture ADFS traffic: http://social.technet.microsoft.com/wiki/contents/articles/1426.ad-fs-2-0-continuously-prompted-for-credentials-while-using-fiddler-web-debugger.aspx
Step1: WIF at RP site intercepts requestBy now your RP is equipped with WIF Http modules. The WSFederationAuthenticationModule intercepts the request and figures out that you are not authenticated. A 302 response is returned with a Location header that contains the address of the ADFS at which you must authenticate. In addition, a set of WS-Federation protocol query strings are also supplied to govern how the flow will behave:
- wa: with a value of wsignin1.0 which means that this is a sign in request (note that WS-Federation also supports sign out flow, so this parameter is mandatory)
- wtrealm: this is the RP itself, and it represents the intended consumer of the token
- wct: this is an optional parameter that specified the time of the response of the RP. This might be used as indication to possible attacks if the IP sees that there is a time lag between this parameter value and the actual time it received the sign in request
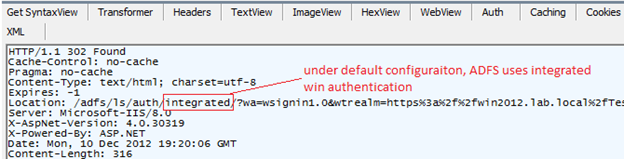
The request is sent to ADFS which detects that it is configured for windows integrated authentication, so it returns yet another 302 response and another location header indicating integrated authentication:
ADFS generates the token containing the claims, signed with the ADFS signing certificate. The RP verifies the token signature as well its conformance to the policy in the Federation Metadata and grants access.
Step4: RP issues a session cookieTo prevent future requests within the same session to go through the same route, a session cookie is generated by the RP and sent to the browser. Each subsequent request is handled by WIF Http module SessionAuthenticationModule and user is granted access:

Single Sign On
Now say you have another application that you want your same set of users to access. So you decided to also convert it to an RP and outsource authentication to the same ADFS. How can SSO between the first and second application be achieved in this case?
The answer is that SSO is already in place and you have nothing to do! The magic is step4 in the walkthrough above. When an RP sends a session cookie to authenticate a specific user for the first application, the same cookie is then sent to the other application when the specific user browses to it; this is the browser default behavior since a cookie is scope for a domain rather than a specific application. WIF SessionAuthenticationModule in the second application identifies the cookie and the user is granted SSO.
To test this, simply create another web application in the lab.local domain and go through the same procedure described before to convert it into an RP which trusts ADFS. Now authenticate using a certain domain user in the first application, change the browser URL to point to the other application and you will see SSO in action.
Authentication Types
In the previous walkthrough – under default ADFS configutaion – we have seen that ADFS uses integrated authentication to authenticate users. This default behavior can be changed to one of the options offered by ADFS:
- Integrated windows authentication
- Forms authentication
- Client certificate authentication
- Basic authentication
You can change the authentication option by locating the web.config of adfs\ls\ virtual directory in ADFS server. Change the order of the localAuthenticationTypes element and position the option you want as the first element.
Now hold on for a moment before getting any bad thoughts! Despite the above 4 methods for authentication, ADFS 2.0 supports one and only one account store and that is Active Directory. This means that the 4 authentication types will all lookup Active Directory to locate the supplied credentials – no exceptions:
- Integrated and basic authentication: read here for a different between the two http://msdn.microsoft.com/en-us/library/aa292114(v=vs.71).aspx
- Forms authentication: you will be presented with a page (instead of the login box in case of windows authentication) to supply the credentials. This page can be customized to suite your specific needs (more on this in a moment); but again the credentials will be checked against AD
- Client certificate authentication: this option is usually used in specific cases where you want to guarantee that specific devices get to access the RP. In this case, a client certificate is issued specifically to a certain device, this certificate in turn gets mapped to a specific user in AD. The certificate gets appended with the sign in request and once verified, gets mapped to that specific user.

The fact that ADFS supports only AD as an account store can be seen as a drawback which will actually limit ADFS adoption. However, ADFS can be configured to trust another STS (for example sitting in front of an Oracle account store) so ADFS can transform claims issued by this STS into the ones needed by the RP that trusts this ADFS. Some will argue that there is no need for this hustle since I can make the RP trust the claims issued by the STS directly; and this is a valid argument. However, the value of this capability becomes apparent in scenario where you want to federate two different infrastructures, one using ADFS and another using a non-ADFS STS.
The above discussion should not make you confuse account stores with attribute stores. As explained, the account store has to be AD, however, attributes can come from four different sources:
- Active directory
- SQL Server
- LDAP
- Custom implementation
Attribute stores hold the profile information for users. This information is then packaged into claims for the RP to make authorization decisions. For example, a user authenticated against AD might have his birth date stored in SQL Server. The birth date gest extracted from SQL and packaged as a claim to be sent to the RP.
Attribute stores are the topic of a coming section.Customize ADFS authentication page
The default forms authentication page offered by ADFS might need to be customized for specific organization needs. One common and trivial requirement is to apply the organization’s look and feel on the page through a master page or adding the company logo.
Another requirement might be adding a One-Time-Password (OTP) authentication mechanism for further security. The below image shows these customizations:

To perform these changes, locate page FormsSignIn.aspx in adfs\ls virtual directory and edit the markup. In order to add the required logic to validate the OTP, you can similarly edit FormsSignIn.aspx.cs and edit event handler SubmitButton_Click to perhaps add your own custom logic prior to calling the SignIn method which actually does the authentication against AD.
For more information about customizing the authentication experience, please refer to the following: http://msdn.microsoft.com/en-us/library/ee895366.aspxWorking with Claims and Attribute Stores
In the previous section we have ‘settled’ with the default claims offered by ADFS 2.0 and WIF Identity and Access wizard at the RP side.
In this this section we will look more into claims and then use SQL Server as an attribute store to issue profile data as claims.
By now you should know that Federation Metadata is what tells the WS-Federation protocol what claims do the RP site mandates or deems as optional. So locate FederationMetadata.xml file in the RP project (you might have to show all files in the Visual Studio), and add the following section in the hierarchy EntityDescriptor/RoleDescriptor:

The Uri of each claim is the claim type, and will match the defined claims at the ADFS – as we will see in a moment. The value of the xmlns namespace is the one defined in WS-Federation 1.2 specification, as you can see here: http://docs.oasis-open.org/wsfed/federation/v1.2/cd/ws-federation-1.2-spec-cd-02.html
Note that the last claim type – birthplace – is not a default claim type in ADFS. This is a claim to be extracted from SQL Server attribute store as we will see later.
Step2: Verifying claims configuration in ADFSNot officially required, but it’s better to make sure ADFS managed to recognize the claims you defined at the RP:

No switch to ADFS configuration console where we will first configure the claims that can be extracted from the account store – which is Active Directory:

The highlighted claims match the ones you defined at the RP. Now let’s configure the claim rules that will ADFS will apply before supplying the claims to the RP:

Forget the “Birth Place Rule” for a moment as it will be discussed with the attribute store.
The “Windows Account Name” rule is a pass-through rule which passes the authenticated windows name as-is to the RP:

The LDAP rules extracts LDAP attributes from AD and passes them as claims to the RP. Below we see how I mapped LDAP attributes UPN and Email Address:

You will notice in the above image that Active Directory is itself an attribute store in addition to being (the only) account store. So why do we need additional attribute stores you may ask? Simply because it’s very rare to find an organization that stores profile data about users in its AD. Profile data is frequently updated and the schema is often changed clearly making AD not a suitable habitat for it.
Step4: Configure attribute store claimAs discussed previously, ADFS can establish a trust with another STS which might talk to another type of account stores; however, by itself ADFS is limited to AD as an account store. Attribute stores allow storing profile information about accounts which can then be sent as claims.
In this example, I will use SQL Server as an attribute store to issue a claim of type Birth Place. First I created a database as follows:

The Id column holds the value extracted from the account store, the idea is that the account store will give the identity while the profile will be loaded from the account store.
Take a look again at the first diagram of step3, there you will see the BirthPlace claim type defined. This is a custom claim that has to be created explicitly.
Next define a new attribute store of type SQL and set the connection string as follows:

Finally, launch the Edit Claim Rules for the RP as shown in step3; only this time we define a custom rule to extract the birth place based on the value of windows account claim. The below image shows the Claims Rule Language to achieve the required:

Use the following code to extract the claims sent from ADFS to the RP:
StringBuilder str = new StringBuilder();foreach (Claim c in ClaimsPrincipal.Current.Claims)
{
str.Append("Type: " + c.Type);
str.Append("Value: " + c.Value);
str.Append("-----------");
}
lt.Text = str.ToString();
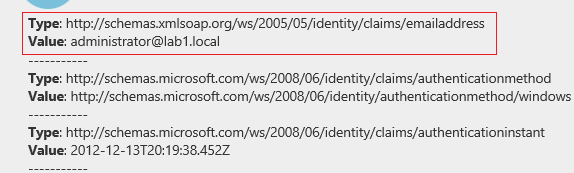
Run the application, again the WF-Federation flow described before will occur in order to authenticate against ADFS. Finally you will get back the below claims:

Claims Engine
By now you know (if you read my WIF article) that ADFS can be either as IP-STS as in the previous section where it sits in front of AD and takes care of authentication RPs inside the same organization. Or it can be in an Acocunt Partner – Resource Partner relationship (to be discussed next) where the ADFS in the Resource Partner role handles claims coming from the Account Partner.
In both cases ADFS passes claims to the end target which are the relying parties; and in both cases the Claims Engine come into play to apply the rules and order to claims processing. The claims engine executes 3 sets of rules in the following order:
- Acceptance rules
- Authorization rules
- Issuance rules
In the next walkthrough I will show you the three rules gets executed in order.
Step1: ADFS receives claims either as an IP-STS or as an R-STSLet’s start with the IP-STS case. Examine the below image:

By default any ADFS installation will have Active Directory as a Claims Provider Trust. This simply means that ADFS in an IP-STS role; which is again what I showed you in the previous example. Now you can see that “Acceptance Transform Rules” are the rules that get executed when ADFS first gets the set of claims. In this case, all rules are pass through from AD into the next level.
Now let’s see the Acceptance Transform Rules when ADFS is in an R-STS role. In the below image I have defined a Claims Provider Trust where ADFS trusts claims issued by another ADFS playing the role of an Account Partner (how I did this is the topic of the next section):

Similarly here you can see that you can define your own Acceptance Transform Rule; only in this case these rules will be applied on claims incoming from the upstream ADFS instead of those coming from AD as an account store.
Step2: ADFS applies authorization rulesWhether in IP-STS or R-STS role, the next step in the pipeline is applying whatever authorization rules defined at the Relying Party trust level.

Any deny claim in this stage will prevent claims from being issued.
Step3: ADFS applies issuance transform rulesAgain at the Relying Party trust level and when ADFS is an IP-STS or R-STS, the next step is to apply the transform rules:

As you can see, these are the rules that I have showed you in the previous section including the custom rule of the SQL attribute store.
In this section my aim was just to show you claims engine in action, however, for a complete and detailed discussion of the engine and the claims rule language (which I used when defining the custom rule), please refer to this great technet blog: http://blogs.technet.com/b/askds/archive/2011/10/07/ad-fs-2-0-claims-rule-language-primer.aspx
ADFS in an Account Partner – Resource Partner Relationship
In a federation trust relationship between two organizations, there are two roles:
- Account Partner (AP): an organization playing the AP role is the one whose users want to access secure resources (relying parties) by the other organization. The AP exposes an IP-STS (ADFS) which users authenticate against. The security tokens generated by this STS are trusted by the other organization’s R-STS (ADFS). These tokens contain claims coming from AD account store and optionally an attribute store.
- Resource Partner (RP): the organization in the scenario above plays the role of the RP. An R-STS (ADFS) hosted by the RP trusts the tokens issued by the IP STS and then issues its own tokens that are trusted by the relying parties that will be accessed by the AP users.
Needless to say, in any trust relationship each organization can play both roles together; meaning it can be an AP whose users want to access the relying party application and it can itself be an RP hosting a set of relying parties to be accessed by users of the other organization.
In this section I will show how to set up a federated relationship between two domain, one of which you have already seen (lab.local) and a new one called lab1.local. The below model illustrates the setup (please execuse my drawing ‘skills’):

Lab1.local users wish to access a relying party (RP) in lab.local. Both domains establish federated trust where user authenticate against AD in lab1.local and get security tokens issued to lab.local. Since trust is in place, lab.local verifies the claims (and can perform whatever transformations it wants) and then hands them to the RP which grants access.
Step1: Configure claim rules at the Account PartnerIn this sample, I will configure a LDAP pass though rule to send email tokens from the account partner to the resource partner.

Here we configure ADFS at the resource partner domain (lab.local) to be a trusted relaying party at the account partner domain (lab1.local). Note here that instead of trusting a single relying party application, we are trusting the entire domain (review the section about R-STS in my WIF article if this is not clear to you).

And then we create a claim rule to allow passing the email claim of which its rule was created in step1.

Here we add ADFS at the account partner domain as a trusted claims issuer at the resource partner domain, so that user at the account partner domain can access applications at the resource partner.

We finally add a pass through rule to allow the email claim incoming from the account partner to be passed to the relying party application (recall that the relying party application – called TestADFS in our first demo – is already in a trust relationship with ADFS in its own domain; i.e. the resource partner domain in this example).

Now let’s see federation in action. An employee in the account partner domain is trying to access an RP in the account partner domain, so he uses the browser to access: https://win2012.lab.local/TestADFS
What do you expect to see at this point? You will be presented with the following page:

If you have been following the setup exactly, you will know that the resource partner trusts two claim providers: its very own Active Directory and that of the account partner. Here it is again:

The page the user gets in the browser is the result of Home Realm Discovery, which is the process of WS-Federation protocol knowing which IP the user wants to use to login. In this case of course the user is an employee of lab1.local domain, so she will select the second option and continue to sign in.
Lets pause for a moment, what if the user “mistakenly” selected option 1 and opted to sign using lab.local domain? In this case, she will be presented with the good old page we customized in the very beginning of the article; here it is again:

Of course, the employee has no credentials at this domain so she will not be able to sign in…
Now let’s go back to the correct scenario, and assume the employee has selected to sign using the correct domain. Recall that under default configuration, ADFS uses windows integrated authentication, so she will be presented with the windows login box:

After signing in, the user gets access to the RP and the Email claim we have configured can be seen below using the same code I used before to iterate through the claims:
I will quickly summarize how the full interaction took place (as always, I always advise using Fiddler to see exactly how the entire interaction took place):
- A user wants to access an RP in a resource partner
- WIF at the RP detects the user is not authenticated and redirects the request to the STS it trusts, its own ADFS in its own domain
- That ADFS in turn trusts the ADFS of the account partner, so it redirects the request to there
- The ADFS at the account partner prompts the user to authenticate via windows authenticated
- The user authenticates and ADFS issues the required claims and passes the security token to ADFS in the resource partner
- ADFS picks the token (and optionally transform or add its own claims) and passes it finally to the RP which grants access
Part 2 of this article is posted here
Hey there, chrome now only lets you install from their web store. Is there any way we can get it on the web store or work around the restriction?
ReplyDeleteclaims pages